


Elementor Tips & Trick
In this article, I want to discuss a little about Elementor and how I work using it. Long story short, here is the list:
- Basic Elementor Introduction
- Tips for creating pages with Elementor
- Basic settings for Elementor elements (content, style, & advance)
- The process of creating templates from scratch
- Determine the theme
- Determine the section
- Wireframe
- Determine the Style (Typography, Collor, & style)
- Create an Elementor page based on the wireframe and predefined styles.
- Input dummy content (image & text)
- Responsive mobile settings
- Optimize image
- Export and Import templates on Elementor
- Difficulties encountered and how to overcome them
Introduction to Basic Elementors
Tips for the first time creating a page with Elementor
Some WordPress themes, by default, display a Header & breadcrumb when we create a new page. When we want to create a page with elements usually Header and Breadcrumb do not need to be displayed. So we have to set the header & breadcrumb so that it doesn’t appear.
Next, we set the template in the Page attribute to “Elementor Full Width” or “Page Builder (Full Width)”. In this example, I use the theme selling well as an example. These are the best selling theme page settings: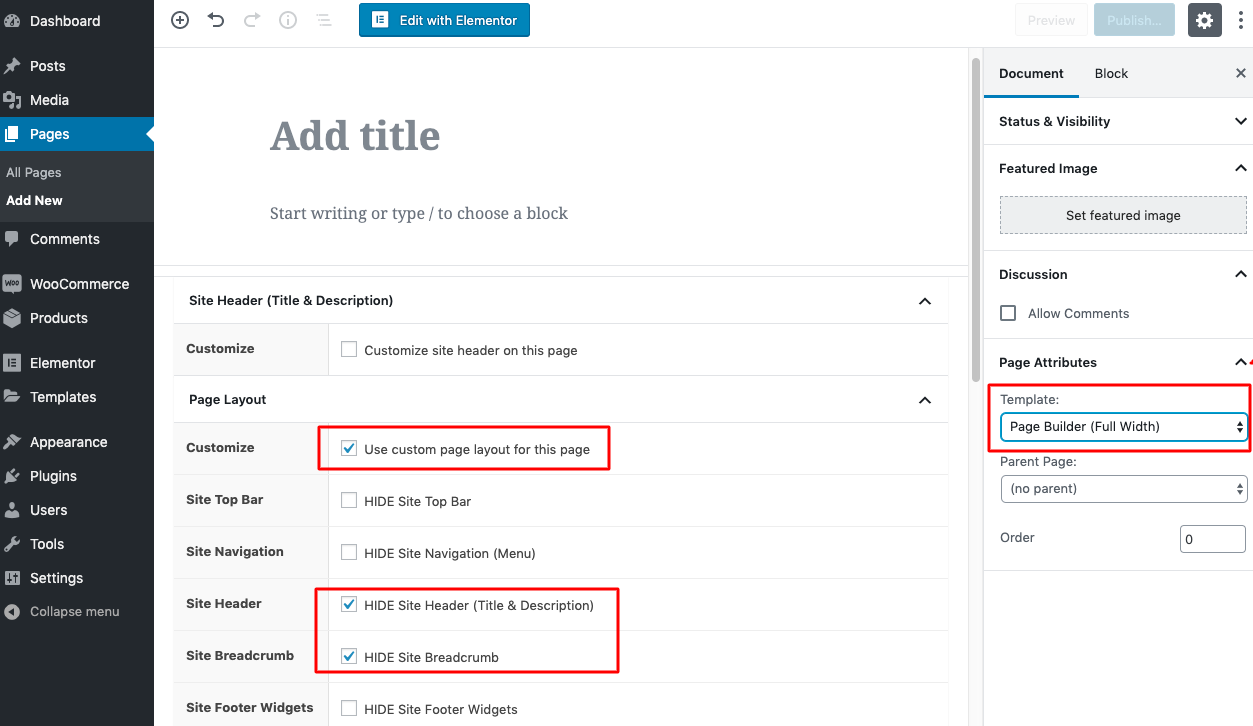
For basic Elementor use, the Artistudio team has prepared the tutorial here.
Basic Elementor Widget settings
Elementor has widgets such as text, images, sections, buttons, and many more. These widgets are components for creating a website page.
See what Elementor widgets have been prepared by Artistudio here.
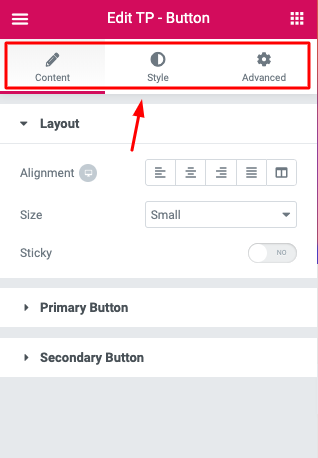
Each widget in Elementor has 3 tab settings, namely, content settings, style, and advance. The screenshot can be seen here:
Using basic elements, the Artistudio team has prepared the tutorial, please access it here
We will always encounter these three tabs when we create a website page using Elementor.
I will briefly explain the functions of the 3 tabs.
The content tab
It is used to manage the content or contents in a widget.
The style tab
It is used to set anything related to the style of a widget, such as color, font size, font type, and so on.
Advanced tab
This tab is an advanced setting of a widget. Among them, you can adjust margins, padding, motion effects, and even input custom CSS for those of you who understand the CSS language.
The Process of Making a Template From The Beginning
I will share step by step how usually I make a template for TokopressID. Every designer has a different way. The way I do it can be different from other designers. I just want to share with friends here, how do I design a template.
So, here is the first one:
Determine the Category
The first thing you need to do is to determine the category. There are various categories for websites, which can be fashion, food, sports, and many more.
To help determine it, I usually look at the website template category in the marketplace, like in the example on themeforest.net, there are many templates with various categories. Please choose a category.
Specify the Section to be Displayed
A website page consists of several sections or sections.
A section on a website consists of several elements. For a better understanding of what exactly a section is, you can see the picture below. 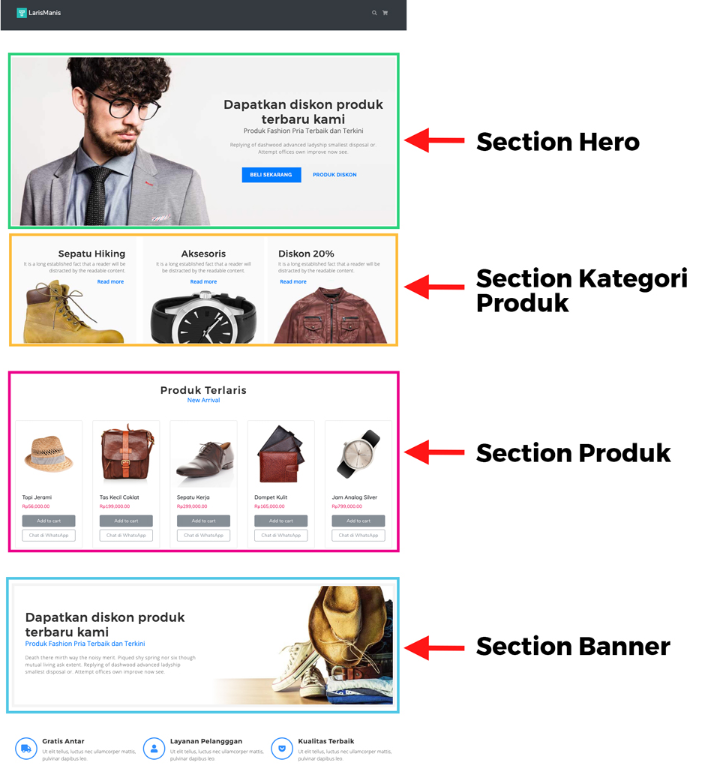
I took the example of the tokopressid men’s fashion template, the template consists of a Hero section, a product category section, a product section, a call to action, and so on.
Now the question is How do you determine the combination of sections?
To find references, one of the ways I usually do is look at website design on sites such as:
- dribble.com
- behance.net
- Elementor template
- From blogs (e.g. Code in WP).
You can also look for references on the website template marketplace or look at the finished website.
I usually collect 3 to 5 references. After that I will make a list, what sections are in the references that I have collected. After that, make a combination from the collection of lists.
Wireframe
After having a list of sections to be displayed, the next step is to create a wireframe or maybe it can be called a website sketch. The wireframe serves as a guide for creating layouts in Elementor later. I usually prefer to make a wireframe on paper, because it’s freer to stick to the tool. example of a wireframe that I sketched myself: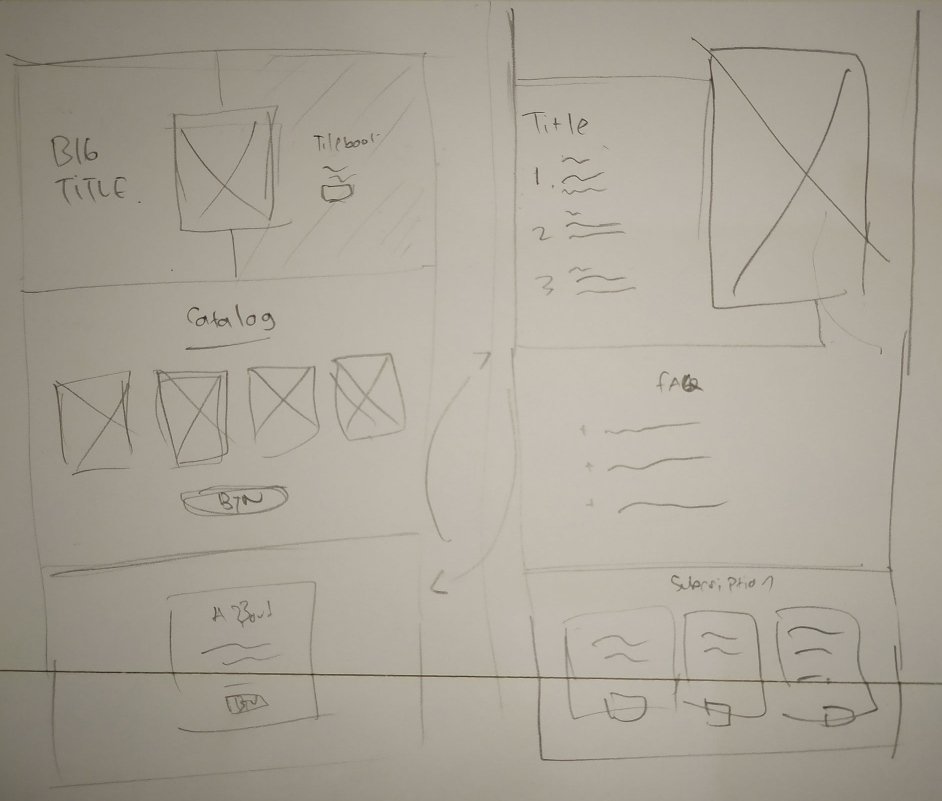
You can also create wireframes using tools such as balsamic mockups, or you can also look for wireframe UI kits that are paid or free for AdobeXD or Photoshop. On certain projects, I also like to use the wireframe UI kit.
Determine the Website Style (Typography, Collor, layout, and Design Style)
The next step is to determine the website style, namely the type of font, color, layout, and design style. I usually look for references in various sources, but I most often look for design references from dribble, Behance, ThemeForest, and sometimes also from Pinterest.
To determine the style, in my opinion, the easiest way is to do the ATM method (Observe, Imitate, Modify). Just choose at most 5 website designs that you like, then combine the styles from the 5 designs, then by combining the 5 styles you can say we already have a new style design. Finally, don’t forget to make modifications, so that the design we make is not the same as the reference.
To make a good website design, of course, it takes a lot of practice.
Creating a website Design Based on a Wireframe and Predefined Styles
After getting design references, wireframes, and more then you can create a website design. Usually, there are 2 ways to do it.
- The first way is to make a design directly on Elementor
- The second way is to create a design in a design tool like AdobeXD first and then convert it to Elementor.
From my point of view, the second method is more effective because the design tool is made specifically for design, the design will be created faster, and when it’s finished, just convert it to Elementor. But with a note, we must know Elementor’s abilities, because not all designs can be made on Elementor.
In this step, I usually focus on creating styles, I will first ignore the images, icons, and text that will be used (there is text, but only dummy).
Input Dummy Content (Image, icon, and text)
After the style is complete, the next step is to input assets on the web design, such as images, icons, text, and others. Image selection must also be considered because not all images are suitable for application in web design.
Choose a picture of good quality. To get good-quality images, you can get paid ones at Shutterstock or Evanto Element. There are also free asset providers such as Unsplash, pixel for photos. For icons and illustrations, you can download them on the flaticon or freepik.
When using free assets, don’t forget to read the terms & conditions. Because there is a web asset provider that requires us to attach the attribution author to the design we use.
Mobile Responsive Settings
At this stage, it means that our design is almost finished. Since most internet users use mobile phones to access websites, our website must be good when opened on a mobile phone.
Elementor already provides settings to adjust responsiveness, so we can easily adjust the appearance of the mobile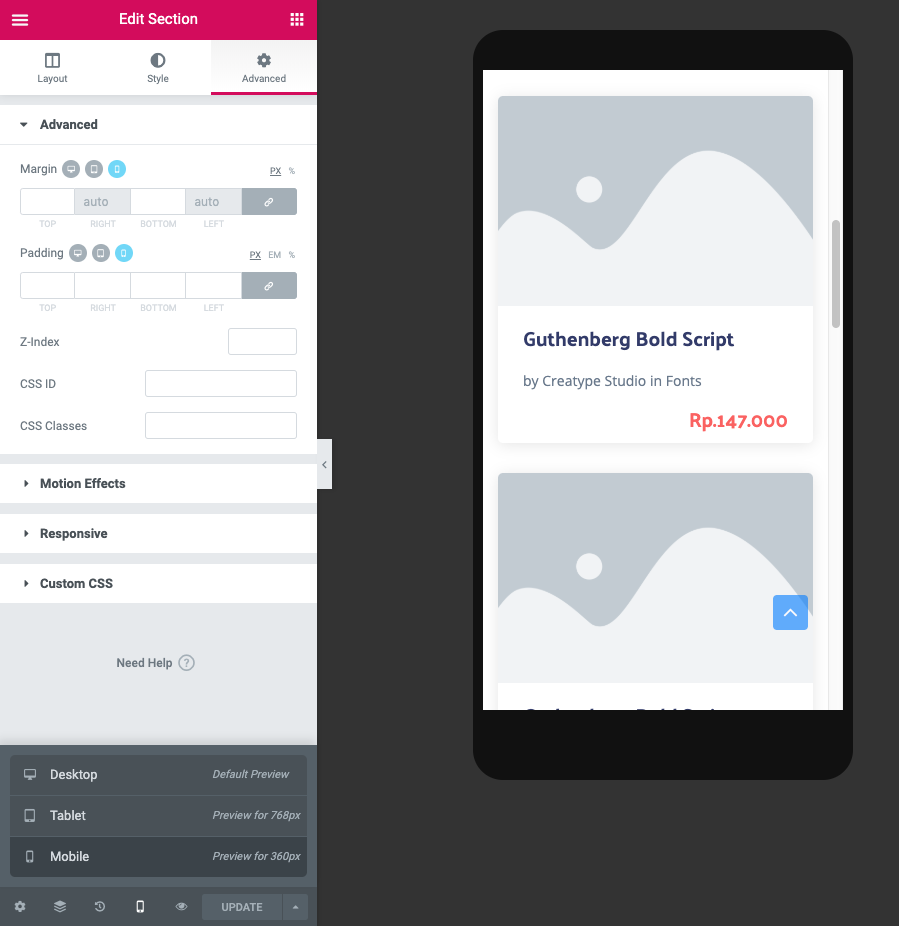
Optimize Image
Try not to make an effort to use the image for the website too large, because it will affect the load time of the website.
If our website is slow, visitors will be lazy to come to visit our website.
Usually, what I do first is check the website using the GTmetrix site, after checking using GTmetrix, it will reveal which images are too large.
If there is an image that is too big, I usually compress it through the tinypng.com site.
Tinypng can compress the image size without reducing the image quality.
This is the final point of the material for the template creation process.
Export-Import on Elementor
Elementor has export and import template features. Make it easier for us if we don’t want to make a template from scratch. TokopressID has prepared several templates with various categories that we can import directly.
To see how to export and import Elementor templates,
Please visit the following tutorial list.
Difficulties Faced & How to Overcome Them
According to my experience, the difficulty faced when creating templates is creating designs that are trending and in demand. The key is to keep learning, keep up with current website design developments. Look for new design references often.
For the use of Elementor, in my experience rarely find a big difficulty. Until now I am happy using it. If there is a will, the Elementors are not difficult to learn.
Apart from Elementor I also use other page builders like WPBakery and KingComposser for several other projects. Among those 3 page builders, to be honest I am most comfortable using Elementor.