
How to Add a Floating Button in WordPress? (A Step-by-Step Guide)
What is Floating Button?
A floating button is a small, interactive element that stays visible on your website as users scroll down the page. Unlike regular buttons that appear only when users reach a certain section, floating buttons are always within reach, ensuring easy access to actions like contacting you, subscribing to a newsletter, or navigating to the top of the page.
Adding a floating button to your WordPress website can significantly improve user engagement and navigation. Whether you want to make your site more user-friendly or boost conversions, a floating button serves as a simple yet effective solution. In this guide, we’ll walk you through the steps to add a floating button to your WordPress site, without needing any technical expertise.
Why Floating Buttons Are Essential for WordPress Websites

In the competitive world of online content and digital marketing, it’s crucial to keep your website visitors engaged and provide them with a seamless experience. Floating buttons play a significant role in making your website more interactive and user-friendly. These small but powerful elements are always visible as users navigate through your website, ensuring they can take immediate action whenever they’re ready. Here are several key reasons why floating buttons are essential for WordPress websites:
- Improved User Experience and Accessibility
One of the biggest challenges for website designers is ensuring that users can easily navigate through their content without feeling frustrated. Floating buttons solve this problem by staying visible and accessible, no matter how far users scroll. Whether they need to contact you, return to the top of the page, or interact with your content, floating buttons provide a quick, non-intrusive solution.
This constant availability enhances the user experience by reducing the amount of time visitors spend searching for essential actions or trying to locate forms. It also ensures that these important elements are available on every page, leading to a more consistent and convenient browsing experience.
- Boosting Conversions with Clear Calls-to-Action (CTAs)
Floating buttons are particularly useful for improving your website’s conversion rate. A call-to-action (CTA) is a prompt that encourages your visitors to take a specific action, such as signing up for your newsletter, making a purchase, or contacting you. By having a floating button that always stays in view, you significantly increase the chances of conversion because visitors don’t have to search for that CTA.
For example, if your goal is to capture more leads through a contact form, a floating button can provide a quick and easy way for visitors to reach out without disrupting their browsing experience. Similarly, if your goal is to encourage newsletter sign-ups, a floating button can provide a clear and constant reminder to sign up, especially when strategically placed at key points throughout the user journey.
- Effective Use of Space Without Cluttering the Page
While traditional buttons can sometimes clutter the page or distract users, floating buttons are a more subtle yet effective alternative. Positioned typically in the corners or edges of a page, they take up minimal space but still draw attention when needed. Because floating buttons are always in a fixed position, they don’t interfere with the main content of the page, allowing your users to focus on the content while still having easy access to the actions they need.
Additionally, you can tailor the floating button’s size and design to match the aesthetics of your site, ensuring it doesn’t overpower your content but still stands out when users need it most.
- Encourages Interaction and User Engagement
Floating buttons aren’t just about making your website more functional; they also encourage greater user interaction. With the button visible at all times, you prompt your visitors to take action. Whether it’s an invitation to chat with a support agent, check out an offer, or interact with content, the visibility of the button invites engagement. The constant reminder can lead to more clicks and interactions, improving the overall activity on your site.
Interactive features like these also create a more dynamic environment for users, helping them feel more involved with your brand and website. The floating button acts as a guiding tool, leading them toward specific actions, which can significantly improve your site’s performance.
- Versatility in Usage
Floating buttons are incredibly versatile and can serve multiple purposes depending on your website’s goals. Some of the most common uses for floating buttons include:
- Contact forms: Provide an easy way for users to get in touch with you without navigating away from the page.
- Social media links: Allow users to quickly share your content on social media platforms or follow your profiles.
- Scroll-to-top buttons: Make it easier for visitors to navigate back to the top of a long page or blog post.
- Special offers and promotions: Keep your current promotions or discounts visible to encourage purchases or sign-ups.
- Pop-up triggers: Use floating buttons to launch pop-ups for important announcements or calls to action.
Each of these uses enhances your website’s functionality, making it easier for visitors to take specific actions that benefit both them and your business.
Prerequisites Before Adding a Floating Button
Before adding a floating button to your WordPress site, there are a few things to keep in mind:
- WordPress Version: Make sure your WordPress installation is up-to-date for the best compatibility with plugins.
- Plugin Installation: Floating buttons are typically added through plugins, so you’ll need to install one to get started.
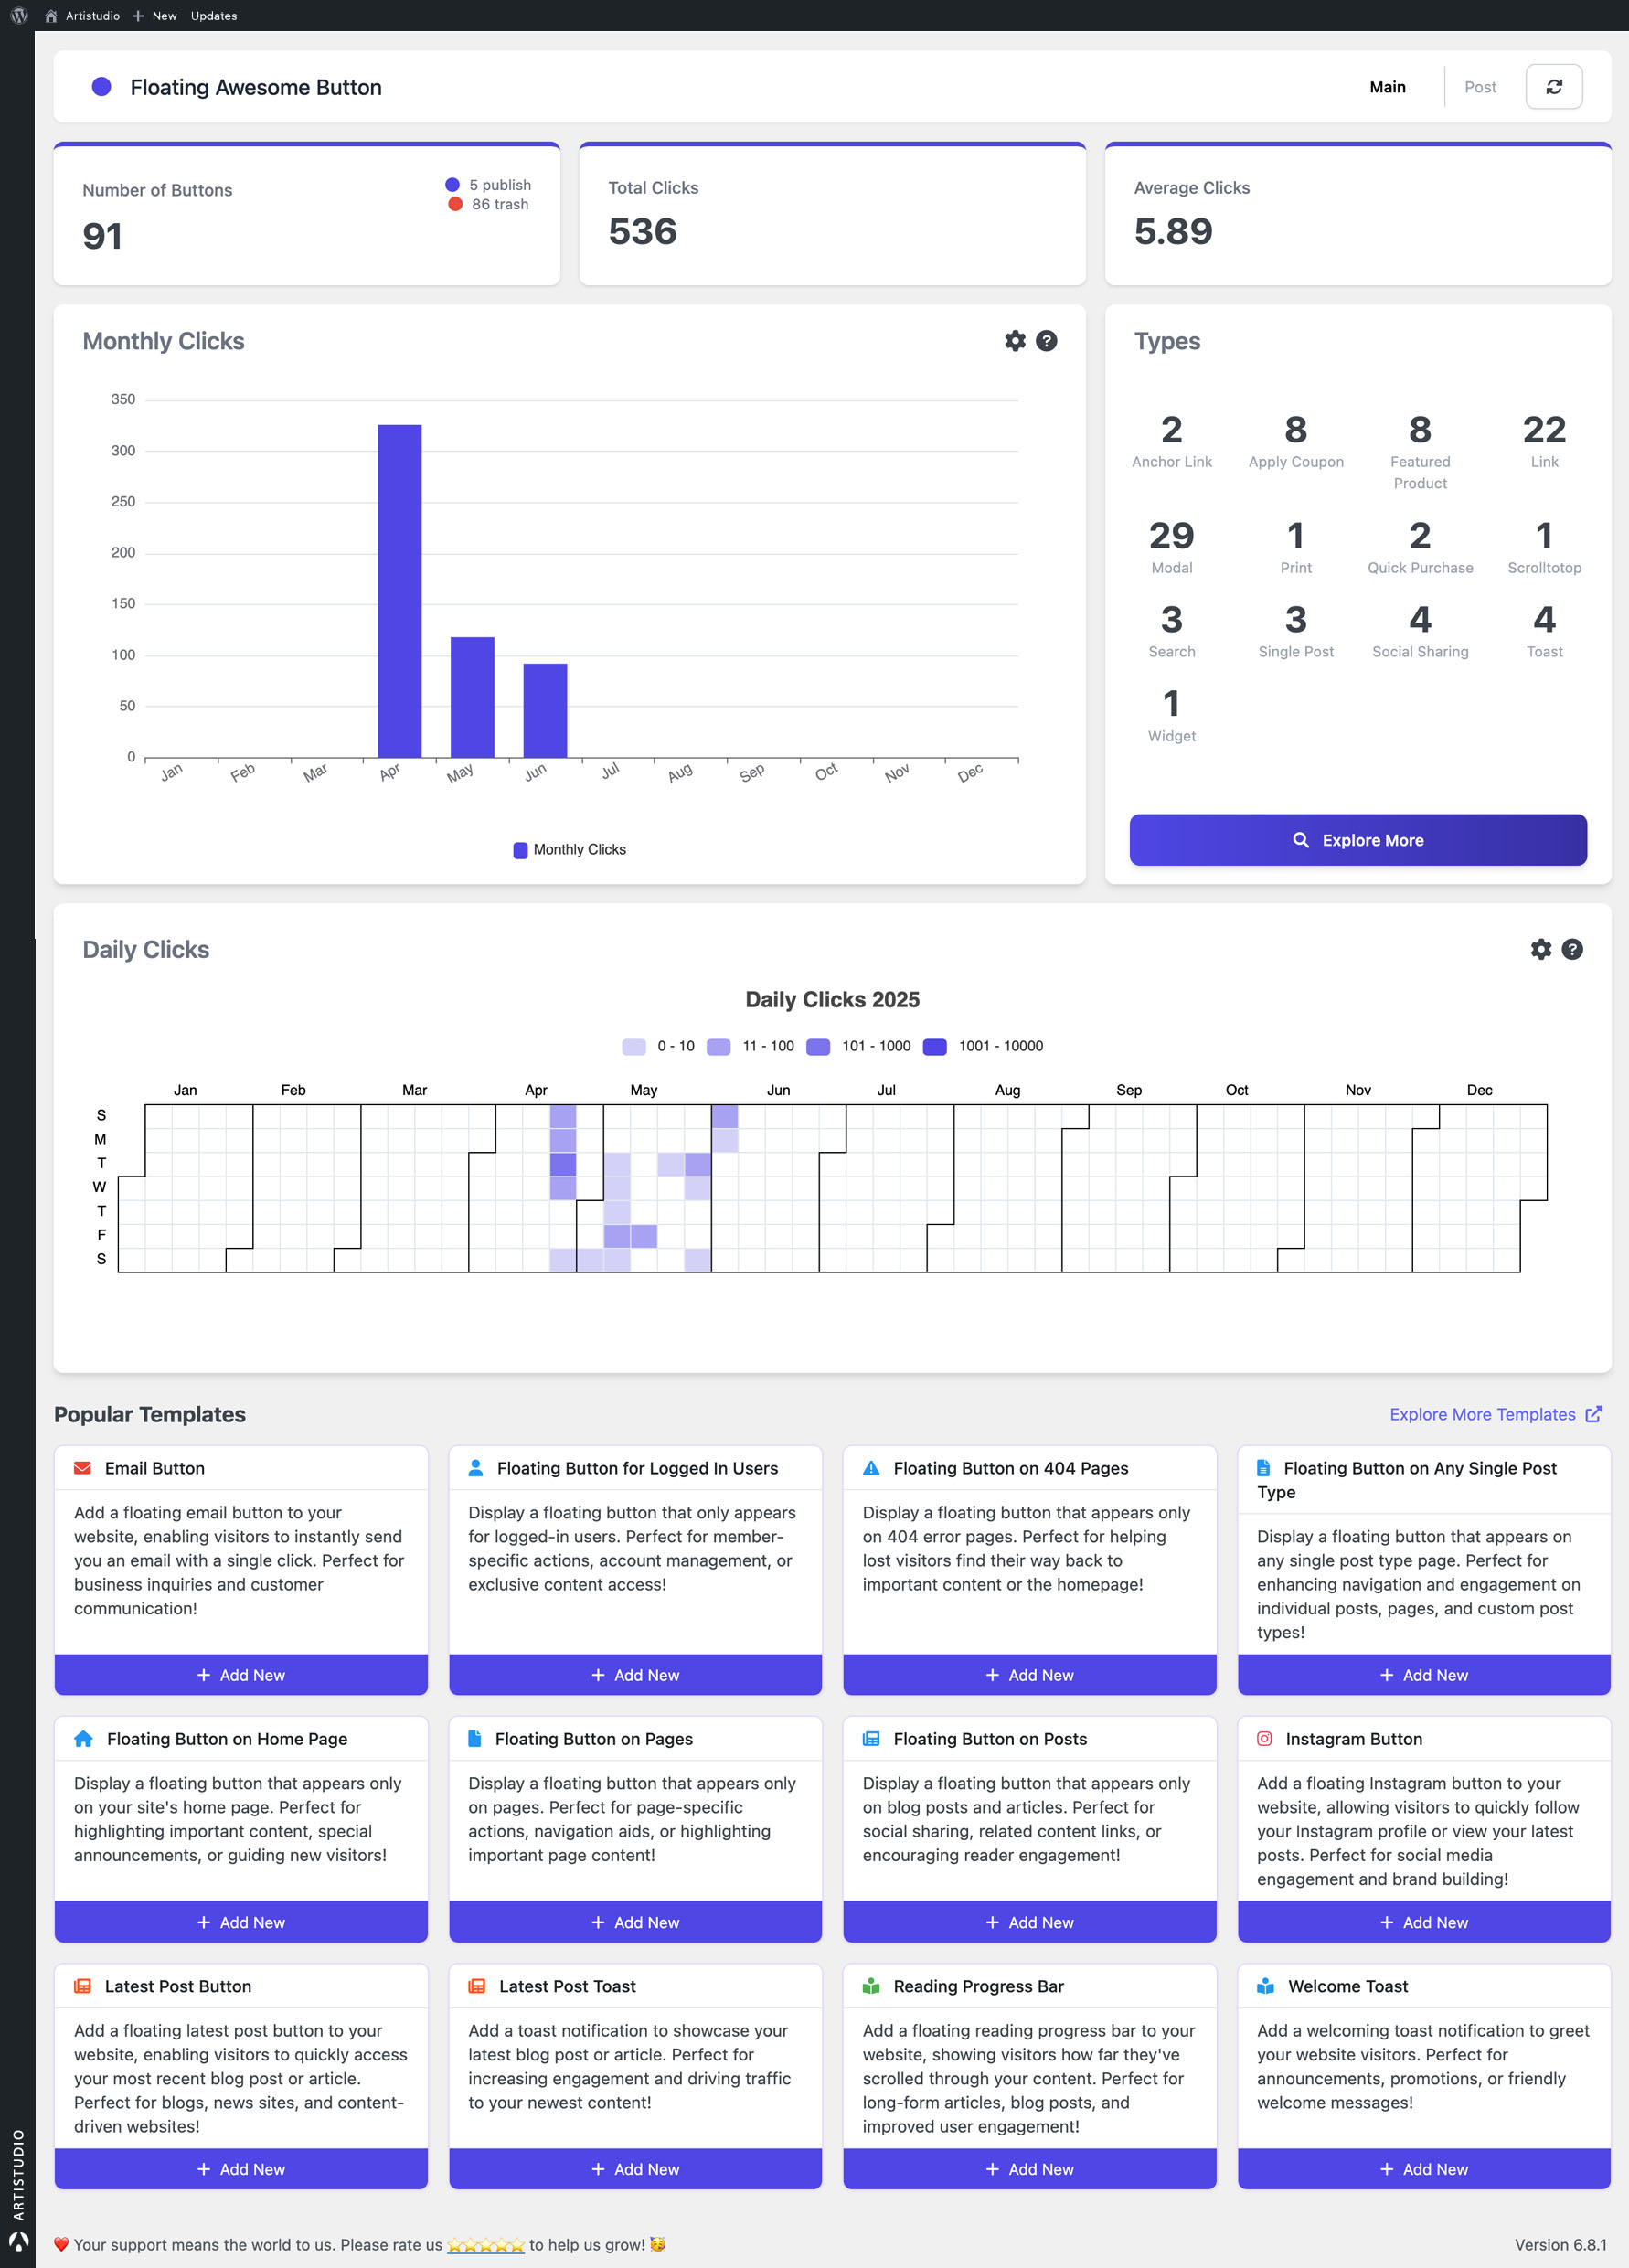
The most popular plugin for adding floating buttons to WordPress is the Floating Awesome Button (FAB). This easy-to-use plugin allows you to customize and add various types of floating buttons without needing any coding knowledge.
Step-by-Step Guide to Adding a Floating Button on WordPress
https://wordpress.org/plugins/floating-awesome-button/
Here’s a simple, step-by-step guide to adding a floating button to your WordPress website using the Floating Awesome Button (FAB) plugin:
Step 1: Install and Activate the Floating Awesome Button Plugin
- Go to your WordPress dashboard.
- Navigate to Plugins > Add New.
- Search for Floating Awesome Button.
- Click Install Now, then click Activate once the installation is complete.
Step 2: Add new FAB
Once the plugin is activated, go to the FAB > Add New FAB section in your WordPress dashboard. You’ll find several button you can add such as :
- Scroll to Top/Back to Top
- Contact Button: WhatsApp, Telegram.
- Social Media Button: Facebook, Twitter/X, Behance, Dribbble, and more.
Click + Add new to create new floating button
Step 3: Customize the Button
In the settings menu, you can also adjust:
- Color: Pick a color that matches your website’s theme.
- Icon: Choose from a variety of icons, or upload a custom one.
- Animation: Add a fun animation to the button, like a fade-in effect.
Step 4: Save and Preview the Floating Button
Once you’ve customized your button, click Save Changes. Visit your website to see the floating button in action.
Advanced Features and Customizations

While floating buttons are useful on their own, they become even more powerful when you explore the advanced features and customizations available through plugins like Floating Awesome Button (FAB). These advanced functionalities allow you to take the standard floating button and tailor it to meet your specific needs, enhancing your website’s performance and user engagement even further. Here’s a deeper dive into the advanced features and how you can customize your floating buttons:
- Pop-ups and Toast Notifications
One of the standout features of floating buttons is the ability to trigger pop-ups and toast notifications. These elements are great for grabbing your visitors’ attention without being overly intrusive.
- Pop-ups: A floating button can trigger a pop-up window that contains important information, such as a special offer, a subscription form, or a call to action (CTA). Pop-ups can be timed to appear when users are about to leave the page (exit-intent pop-ups), after a certain amount of time, or when a visitor has scrolled a specific percentage of the page. This feature is perfect for boosting engagement with minimal interruption to the user experience.
- Toast Notifications: Unlike pop-ups, toast notifications are small, non-intrusive messages that appear temporarily in the corner of the screen, providing information such as confirmation of a sign-up or a reminder to take action. They are an excellent tool for subtle, yet effective communication. For example, after a user signs up for a newsletter, a toast notification can appear briefly to thank them for subscribing, increasing positive user interaction.
Both pop-ups and toast notifications help draw attention to important messages and can significantly improve user experience, provided they are used appropriately and not overdone.
- Conditional Display Rules
One of the most advanced features of floating buttons is the ability to set conditional display rules. These rules allow you to control when, where, and how your floating button appears on your WordPress website. You can create a dynamic user experience based on several factors, such as:
- Time Rules: Show your toast during specific hours (e.g., 9 AM–5 PM).
- Day Rules: Display it on certain days (e.g., weekends).
- Date Range: Define start and end dates for your year-end sale.
- Post Type: Limit display to certain pages like product or sale pages.
- Specific Page: Show or hide the toast on specific pages, such as the cart or checkout page.
- Conditional Tags: Display the toast only for logged-in users or those who meet certain conditions.
These conditional rules ensure that your floating buttons are always relevant and timely, leading to better engagement and conversions.
- Custom Button Actions
The action that a floating button takes when clicked can be customized to perform a variety of tasks, allowing you to tailor the button’s behavior to suit your business goals:
- Opening Popups or Forms: Rather than simply redirecting visitors to another page, you can configure the floating button to open a form or a popup. For example, you can prompt users to sign up for your newsletter by opening a sleek, interactive form right on the page.
- Redirecting to Specific URLs: You can set the floating button to link to any URL, whether it’s a page on your site (e.g., a product page or about page) or an external link. This can be particularly useful for marketing campaigns, where you may want to drive traffic to specific landing pages.
- Integration with Other Plugins
The Floating Awesome Button (FAB) plugin can be seamlessly integrated with a variety of other WordPress plugins, extending its functionality and providing even more opportunities to enhance your website. Some key integrations currently supported by FAB include:
- Contact Form 7: Integrate your floating button with Contact Form 7 to trigger forms directly when users click on the button. This makes it easy for visitors to engage and send inquiries without navigating away from the page.
- Google Site Kit: With Google Site Kit integration, FAB can leverage your traffic data to better target your audience. By understanding user behavior and traffic patterns, you can tailor your floating button’s actions to boost engagement and increase conversions.
- WPForms Lite: By linking your floating button with WPForms Lite, you can directly open forms or surveys to collect information or feedback. This integration helps streamline lead generation and user interaction.
- WooCommerce: For e-commerce sites, FAB can be integrated with WooCommerce to create floating buttons that drive sales. You can set up buttons to quickly access product pages, offer discounts, or encourage cart checkouts, improving the shopping experience and boosting sales.
These integrations make it easier to collect and track valuable user data, improving your marketing and communication strategies.
Tips for Maximizing the Effectiveness of Floating Buttons

Floating buttons are a powerful tool for enhancing user engagement and driving conversions, but like any feature, their effectiveness depends on how well they are implemented. To make sure you’re getting the most out of your floating buttons, here are some valuable tips for maximizing their effectiveness:
- Strategic Button Placement
The position of your floating button plays a crucial role in its visibility and usability. It’s important to choose a placement that’s both noticeable and non-intrusive, so users can engage with it without it becoming a distraction.
- Common placements: The most popular placements for floating buttons are at the bottom-right or bottom-left corners of the page. These positions are visible but not too intrusive, providing a good balance between accessibility and user experience. They also ensure that the button doesn’t block important content, like images or text.
- Avoid covering essential content: Be mindful not to place the button in a position where it covers key content or navigational elements. This can frustrate users, potentially leading to a negative experience on your website.
- Limit the Number of Floating Buttons
Although floating buttons are highly effective, using too many can overwhelm your visitors and detract from your website’s clean design. Too many floating buttons competing for attention can lead to confusion, decreasing their overall impact.
- Focus on a single action: For best results, use one primary floating button for the most important action, such as contacting you, signing up for a newsletter, or completing a purchase. This reduces clutter and ensures your visitors aren’t distracted by too many choices.
- Use multiple buttons strategically: If you need to use more than one floating button, make sure they are placed at different times or on different pages where they are needed most. For example, use a “back-to-top” button on long pages and a “contact us” button on service-related pages. Keeping your floating buttons functional and purposeful will prevent them from becoming overwhelming.
- Customize the Button’s Appearance to Match Your Branding
The design of your floating button is a reflection of your website’s overall aesthetic. A well-designed button that blends seamlessly with your website’s theme can encourage user interaction, while a poorly designed or out-of-place button might turn visitors away.
- Button Color and Style: Choose a color for your floating button that contrasts well with the background but doesn’t clash with your overall design. The button should stand out, but it should also look like a natural part of your website. Customizing the style—such as the button’s shape, border, and shadow—can make it more visually appealing and in line with your brand identity.
- Icon Selection: If your button includes an icon (such as a shopping cart or envelope), make sure it’s easily recognizable and intuitive. The icon should reflect the button’s purpose clearly. For instance, a shopping cart icon is ideal for an e-commerce site, while a pencil icon works well for a contact form button.
- Text and Call to Action: If your button includes text (e.g., “Sign Up Now,” “Contact Us,” or “Shop Now”), make sure the wording is clear, concise, and action-oriented. A strong call to action (CTA) like “Get Started” or “Join the Movement” can motivate users to take the next step.
- Make Sure It’s Mobile-Responsive
With a significant portion of web traffic coming from mobile devices, it’s essential to ensure your floating button is fully optimized for mobile users. Mobile visitors should be able to interact with the floating button without any issues, regardless of screen size.
- Responsive Design: Floating buttons should adjust their size and position depending on the screen size. For example, on mobile devices, the button may need to be larger for easy tapping, or positioned further away from content to avoid obstructing important parts of the page.
- Testing Mobile Performance: Always test the floating button on different mobile devices to ensure it functions properly. The button should not obstruct any critical content, and it should remain functional whether the user is scrolling through the page or interacting with other elements.
- Track Performance and Iterate Based on Data
The best way to understand whether your floating button is effective is by tracking its performance. You can use built in analytics to monitor user interactions with the button and assess its impact on conversions.
Conclusion
Adding a floating button to your WordPress site is a simple yet powerful way to improve user interaction and boost conversions. With the Floating Awesome Button (FAB) plugin, you can easily customize and add buttons that stay visible as users scroll, making it easier for them to take action. Whether you want to encourage users to contact you, sign up for a newsletter, or quickly return to the top of the page, FAB provides a user-friendly solution that doesn’t require any technical expertise. Enhance your website’s functionality and make it work harder for you today!