
How to Migrate Your Website Safely with WP Migrate DB (Complete Guide)
Migrating a database to a new website requires a long process that takes lots of time. However, there is a plugin that can automatically migrate your databases by simply clicking on the setting. That’s WP Migrate DB plugin for you.
In this post, we will tell you the step-by-step guide on how to configure WP Migrate DB settings for migrating websites.
What Is WP Migrate DB?
WP Migrate DB is a WordPress migration plugin by Delicious Brain. This plugin makes migrating databases from your old WordPress site to the new site hassle-free. Furthermore, it allows you to export your database, perform a find & replace that handles serialized data, and save migration profiles.
Instead of downloading the database to your hard drive and then uploading it again, WP Migrate DB Pro allows you to sync it directly between two sites. As a result, migrating sites is easy, fast, and straightforward with WP Migrate DB.
What Can You Do with WP Migrate DB?
WP Migrate DB is basically a plugin for migrating website databases to another website, but, you can do more with it. WP Migrate DB can do more things, such as:
- Migrating website
- Find & replace
- Push or pull databases
- Backup databases before replacing them
In addition to that, WP Migrate DB also makes migrating websites easier by providing features like:
- Push & pull media files between websites with Media Files Addon
- Automatic migration with CLI Addon
- Push & pull themes and plugins with Theme & Plugin Files Addon
- Migrate SQL files easily with Multisite Tools Addon
Read the complete review about WP Migrate DB here.
How to Migrate Websites with WP Migrate DB?
In order to use WP Migrate DB, you should understand how to install & configure the setting of WP Migrate DB. We will summarize them into a step-by-step guide. The following steps are based on the new user interface of the WP Migrate DB Pro 2.0+ release.
Requirements
Before you can install the plugin, you need to make sure your environment meets the following requirements, which are as follows:
- The latest or second-latest version of WordPress
- PHP 5.2.4+
- MySQL 5.0+
- Apache 2+ or Nginx 1.4+
- Firefox and Webkit-based browsers like Chrome or Safari. Internet Explorer is not supported.
If you have met the requirements, you can continue to the next step.
Install WP Migrate DB Plugin on WordPress
- Open your WordPress administration page
- Go to Plugin
- Search “WP Migrate DB by Delicious Brains”
- Click install and activate the plugin
After installing the plugin, you will find the WP Migrate DB configuration in the Tools section of your WordPress admin menu. Inside, there are options to do export, push or pull database, find & replace, and import databases with WP Migrate DB.
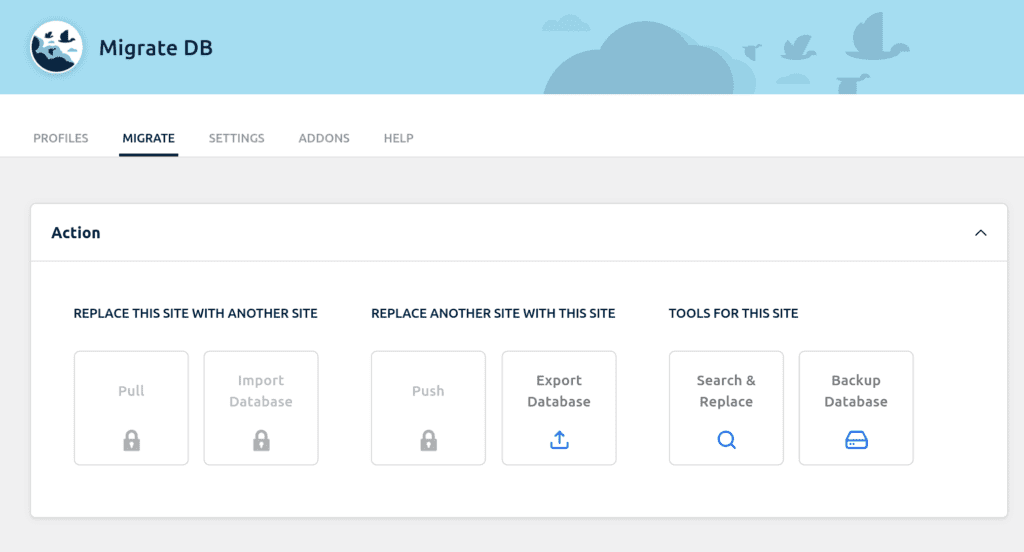
Exporting Databases
The free version of WP Migrate DB limits the functionality up to export database only. If you want to make a backup of your site’s database, simply choose Export File in the plugin menu. Then, WP Migrate DB will generate a MySQL dump, a snapshot of your site’s database.
Steps to export databases in WP Migrate DB:
- In the WP Migrate DB user interface, click the Migrate tab or the New Migrations button
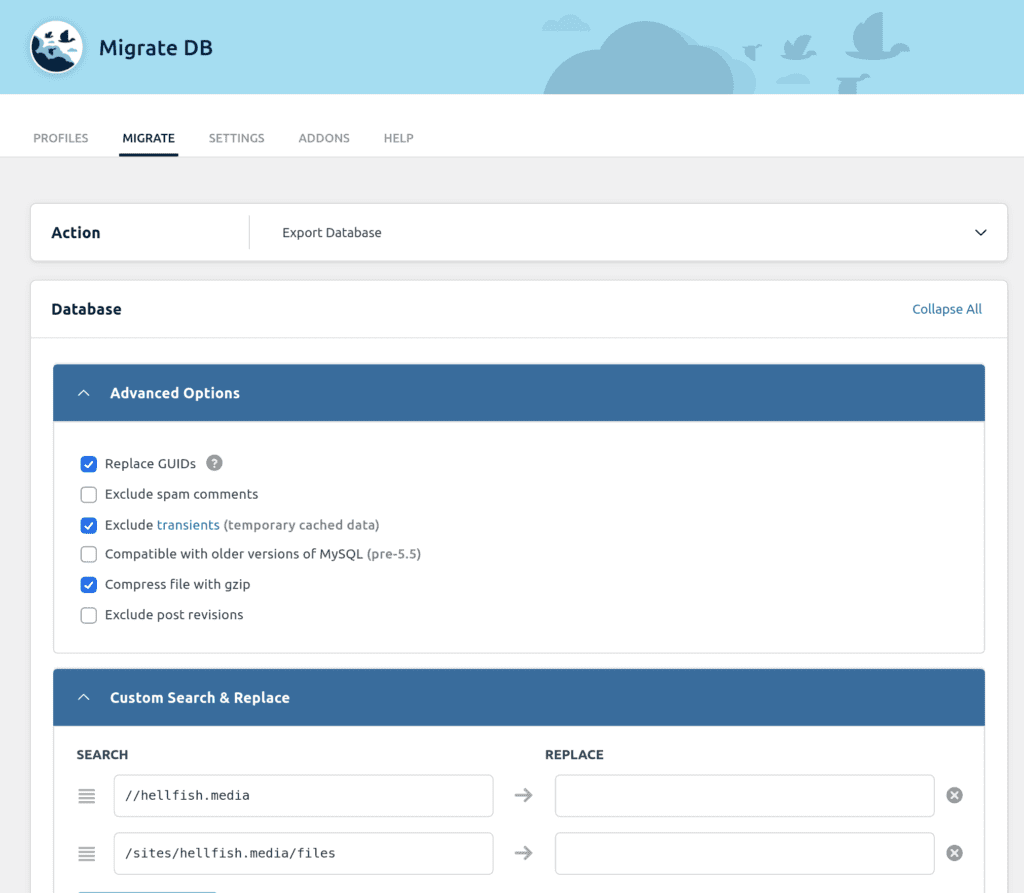
- Click the Export Database button in the list of migration options
- Fill in the empty text fields in the “Custom Find & Replace” section if needed
- Configure any additional migration options if needed
- Click the Export Database button to start the export
- You can save the current migration profile for future use
Under the find & replace section, there is an option which tables to export. You can either back up all at the same time or make a selection. Next, you also have the option to exclude certain post types from the backup in case you don’t need them on the new site.
In addition to that, the additional migration options of WP Migrate DB includes:
- Replace GUIDs (Global Unique Identifiers – important for RSS feeds)
- Exclude spam comments (because why would you copy those?)
- Exclude transients (this is temporary cached data)
- Make the database compatible with older versions of MySQL
Pull Databases
The Pull Database feature is only available in WP Migrate DB Pro. This feature allows you to replace a local WordPress database with the contents of a remote WordPress database.
Steps to Pull Databases in WP Migrate DB:
- Log in to the site that will have its database replaced by a remote database
- In the WP Migrate DB user interface, click the Migrate tab, or the New Migrations button
- Click the Pull button in the list of migration options
- Log in to the remote site and browse to the WP Migrate DB user interface
- Click the Settings tab
- Ensure the “Pull” toggle under “Permissions” is enabled
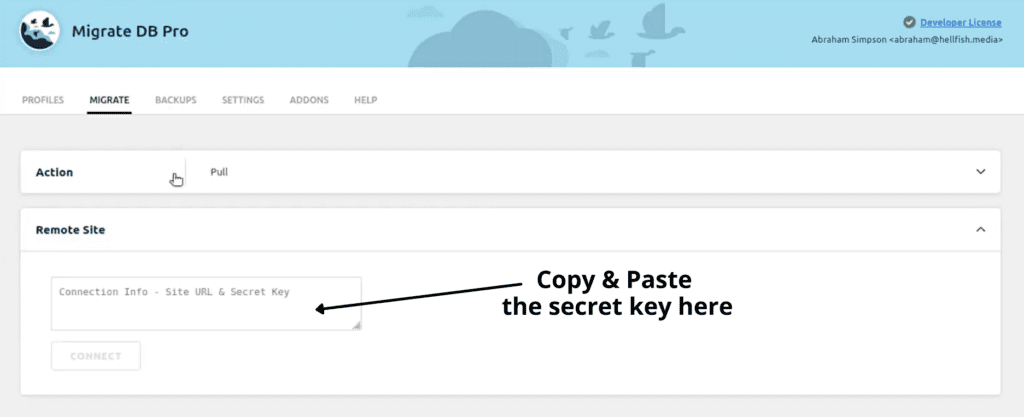
- Highlight and copy the “Connection Info” into your clipboard, or use the Copy to Clipboard button
- Switch back to the site you logged into during step 1
- Paste your clipboard into the “Connection” text area in the “Remote Site” panel, you will be connected to the remote site
- Configure any additional migration options (optional)
- Click the Pull button
- The remote database will be pulled into your local WordPress installation
To use this feature, you need a secret key to connect the two websites you want to use for the pull database. You can find the secret key on the Settings page.
Push Databases
The Push Database feature is also only available in WP Migrate DB Pro. This feature allows you to replace a remote WordPress database with the contents of a local WordPress database.
Steps to Push Databases in WP Migrate DB:
- Log in to the site that will have its database pushed to a remote site
- In the WP Migrate DB user interface, click the Migrate tab or the New Migrations button
- Click the Push button in the list of migration options
- Log in to the remote site
- Click the Settings tab
- Ensure the “Push” toggle under “Permissions” is enabled
- Highlight and copy the “Connection Info” into your clipboard, or use the Copy to Clipboard button
- Switch back to the site you logged into during step 1
- Paste your clipboard into the “Connection” text area in the “Remote Site” panel, you will be connected to the remote site
- Configure any additional migration options (optional)
- Click the Push button
- The local database will be pushed to your remote WordPress installation
Similar to the Pull Database feature, you need a secret key to connect the two websites you want to use for the push database. You can find the secret key on the Settings page.
Find & Replace
You can insert links to the “Custom Find & Replace” section where you can define additional find and replace. You can use this Find & Replace feature if you have references to your site’s URL in your database that slightly differ in format from your main site’s URL.
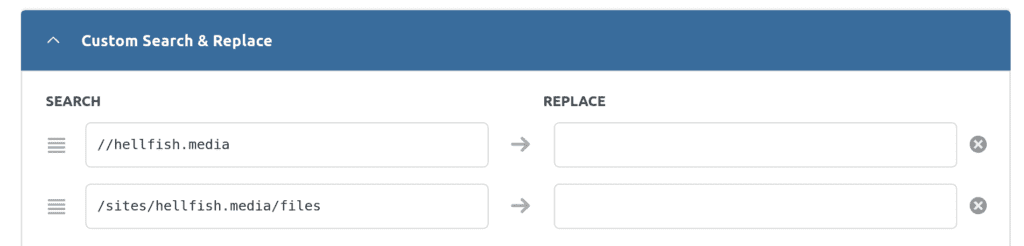
Steps to Find & Replace in WP Migrate DB:
- In the WP Migrate DB user interface, click the Migrate tab or the New Migrations button
- Click the Find & Replace button in the list of migration options
- Fill in the empty text fields in the “Find / Replace” section. Please refer to the Find & Replace Fields documentation if you’re unsure of what these values should be
- Configure any additional migration options (optional)
- Click the Find & Replace button
Migrate Website with WP CLI Addon by WP Migrate DB
The CLI addon extends WP Migrate DB’s command with more subcommands. It gives you push, pull, and import commands, and allows you to specify all the arguments to run a migration. You can use this to set up migrations to run automatically with a cron job. Before using this addon, you will need to install WP-CLI first.
See the list of subcommands for CLI Addon:
- export
Save migrated database as an SQL file. - find-replace
Run a find & replace on the database. - push
Run a push migration. - pull
Run a pull migration. - profiles
Output a list of saved migration profiles - profile
Run a migration using a saved migration profile. - setting
Update WP Migrate DB Pro settings directly from the CLI - import
Import a SQL export file from the CLI
Tutorial
Export Database
Pull Database
Push Database
Migrate with WP CLI Addon
Find out more WP Migrate DB tutorial videos on Delicious Brains Official Youtube Channel and WP Migrate DB videos.
References
Related Post