


How to Download cPanel Backup Using Command Line (cliget / CurlWget)
The idea to save Cpanel backups directly to the server without having to download them to a local computer is to make it easier to download backups automatically, efficiently, and quickly.
CurlWget is a browser add-on from Google Chrome, while CLIget is a Firefox add-on tasked with providing the command line string ‘curl’ or ‘wget’ for copying/pasting on console sessions (such as Unix/Linux remote shells). This makes it easier for us to download protected files on a remote machine that can be controlled.
In this article, we want to share step by step with you how to download Cpanel backup to the server using CurlWget or CLIget in the terminal. Let’s get started!
Step by Step
Here is step by step to download Cpanel Backup Using Command Line:
How to Download cPanel Backup Using CLiget/Wget
To download the backup from cPanel to server via command line:
- Install Add On Cliget if you use Firefox, or Wget if you using Google Chrome.
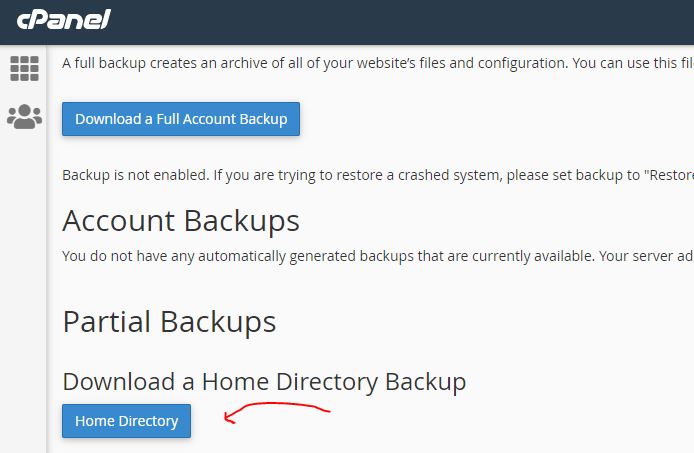
- Log into cPanel to get the backup download link.
- In the Files section, click on the Backups icon
- Click the link for the backup file you wish to download.
- then it will appear in the cliget link generated curl like this.

- Copy and paste the generated output to your command line and specify the location where you want to save the backup file
- press Enter and wait for it to finish.
Read also: How to Download File using Command Line from any Website (Cliget / CurlWget)
Troubleshoot
There are several troubleshooting issues that often occur when downloading Cpanel backups using the command line and here’s how to handle them:
Not Working Because Cookies
To solve this cookie issue, you can use the Cookie Manager extension which can be installed on both Firefox and Chrome browsers.

Cookie Manager is an addon that let you easily edit cookies in your browser. Simply add it to your browser and start surfing the web. For any webpage that you would like to edit cookies, please click on the toolbar button.
Once the popup is ready, you can see the list of available cookies for the active tab. Each cookie has seven different properties.
In order to edit any cookie, please click on the edit button next to each cookie item. If you want to delete a cookie, please mark the checkbox next to a cookie and then click on the remove button on top toolbar.
Not Working Because limited Whitelist IP
You’re not allowed to add an IP address, you can try to create a SOCKS proxy on a Linux server with SSH to bypass content filters.
Well, if you have SSH access to _any _server, you can probably set up your own SOCKS5 proxy and tunnel all your traffic over SSH.
From that point on, what you do on your laptop/computer is sent encrypted to the SOCKS5 proxy (your SSH server) and that server sends the traffic to the outside.
It’s an SSH tunnel on steroids through which you can easily pass HTTP and HTTPs traffic.
And it isn’t even that hard. This guide is for Linux/Mac OSX users that have direct access to a terminal, but the same logic applies to PuTTy on Windows too.
Set up SOCKS5 SSH tunnel
It boils down to a few key actions;
- You open an SSH connection to a remote server. As you open that connection, your SSH client will also open a local TCP port, available only to your computer. In this example, I’ll use local TCP port :1337.
- You configure your browser (Chrome/Firefox/…) to use that local proxy instead of directly going out on the internet.
- The remote SSH server accepts your SSH connection and will act as the outgoing proxy_/vpn_ for that SOCKS5 connection.
- To start such a connection, run the following command in your terminal.
$ ssh -D 1337 -q -C -N user@yourdomain.com
What that command does is;
-D 1337: open a SOCKS proxy on local port :1337. If that port is taken, try a different port number. If you want to open multiple SOCKS proxies to multiple endpoints, choose a different port for each one.
-C: compress data in the tunnel, save bandwidth
-q: quiet mode, don’t output anything locally
-N: do not execute remote commands, useful for just forwarding ports
user@yourdomain.com: the remote SSH server you have access to
Once you run that, ssh will stay in the foreground until you CTRL+C it to cancel it. If you prefer to keep it running in the background, add-fto fork it to a background command:$ ssh -D 1337 -q -C -N -f user@yourdomain.com
Now you have an SSH tunnel between your computer and the remote host, in this example yourdomain.com.
Use SOCKS proxy in Chrome/Firefox
Next up: tell your browser to use that proxy. This is something that should be done per application as it isn’t a system-wide proxy.
In Chrome, go to the chrome://settings/ screen and click through to Advanced Settings. Find the Proxy Settings.
In Firefox, go to Preferences > Advanced > Network and find the Connection settings. Change them as such:
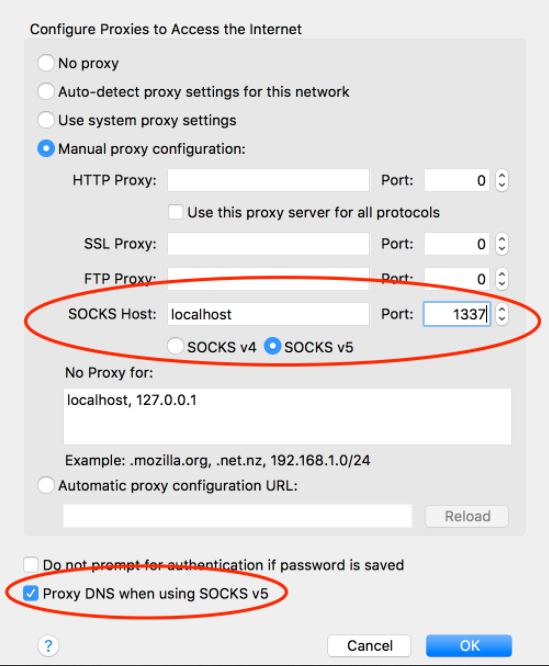
Now, your browser will connect to localhost:1337, which is picked up by the SSH tunnel to the remote server, which then connects to your HTTP or HTTPs site.
Testing the SOCKS55 proxy
Visit the “what is my IP” website and refresh the page before and after configuring your SOCKS proxy.
If all goes well, your IP will change to your remote SSH server, as it is now the outgoing IP for your web browsing.
If your SSH tunnel is dead, stuck, or has not started, your browser will tell you that the SOCKS proxy is not responding.
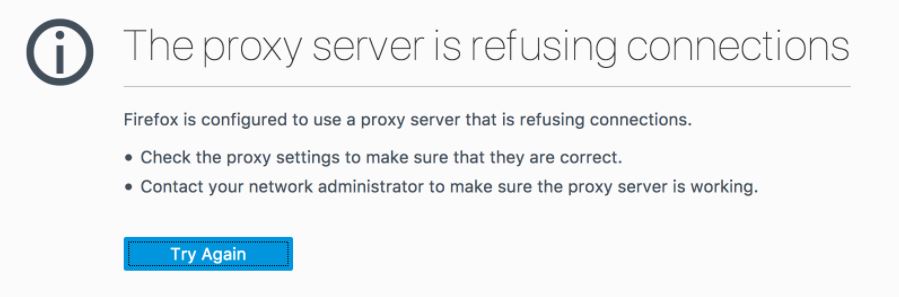
If it appears like that, restart the ssh command, try a different port or check your local firewall settings.
How to Allow / Deny IP via WHM
Sometimes we need to allow certain IPs to communicate to the server without worrying about being blocked by a firewall. Follow the step by steps to allow IP via WHM below:
Precondition
In order to follow this guide you will need:
- Server / VPS that has installed cPanel / WHM
- Server / VPS already installed CSF
- You have root access to WHM
How to Allow IP
- Login to WHM via the link
https://youripserver:2087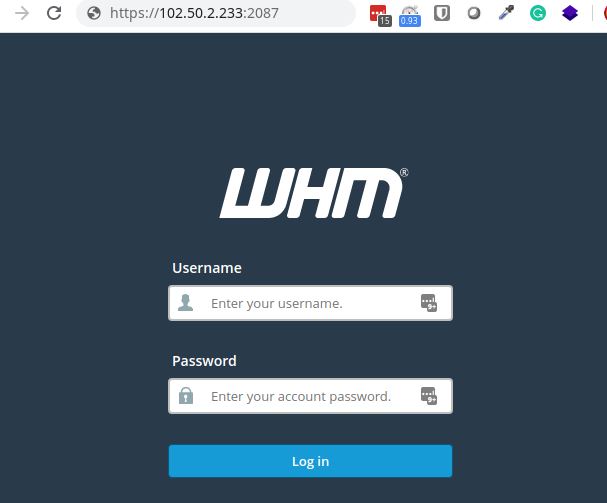
Go to the ConfigServer Security & Firewall menu- In the Quick Allow field, enter the IP Address you want to allow
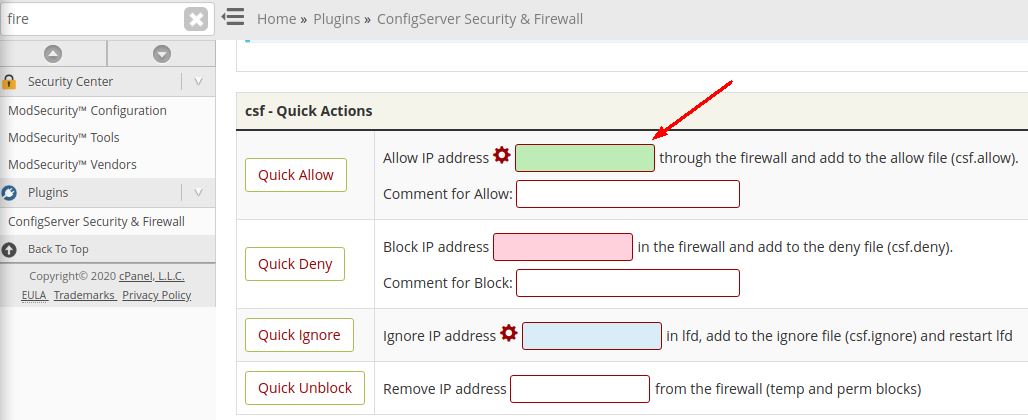
- In the comment for allow column, please enter a brief description of the allowed IP (Example: Office Public IP).
- After that click Quick Allow to save the settings.
How to Deny IP
- Login to WHM via the link
https://youripserver:2087 - Go to the ConfigServer Security & Firewall menu
- In the Quick Deny column, enter the IP Address you want to deny/block
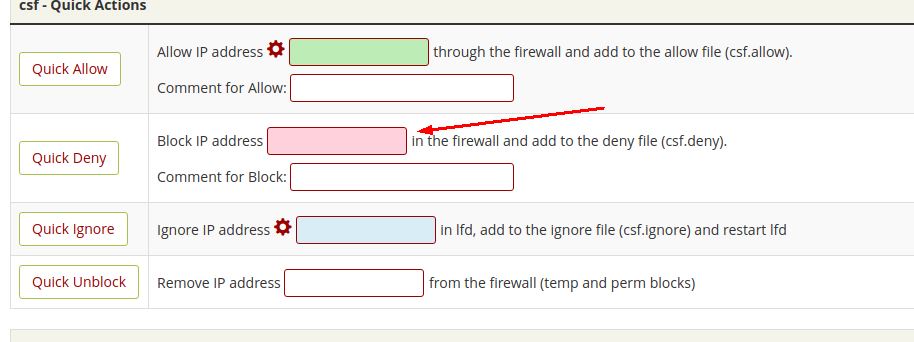
- In the comment for allow column, please enter a brief description of the denied IP (Example: Attacker IP).
- After that click Quick Deny to save the settings.
One of the features of WHM is that it can be integrated with 3rd party plugins, one of the mandatory plugins to install is CSF. By using CSF we can easily do firewall management. Through this guide, it means that you can allow and deny IP in WHM via CSF.
Conclusion
Well, after reading the article on how to download Cpanel backup using cliget / curlwget, and also how to troubleshoot when the extension doesn’t work, I hope you have understood and implemented this tutorial. hopefully useful, let’s share with your friends, sharing is caring!
Reference